Saturday, April 29, 2006

Museum Originals


(click to enlarge those pictures)
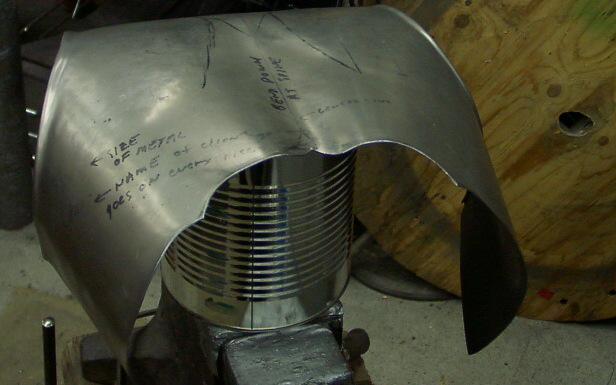
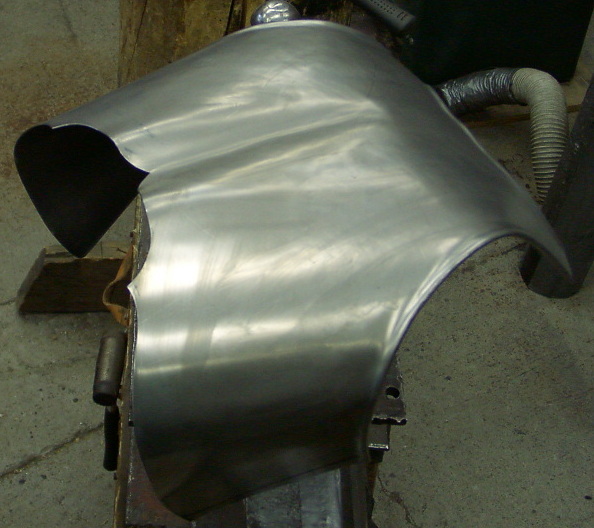
This backplate provided an inspiration to see if I could make a backplate as pretty as this one. It was made for a prince, or at least, a Knight of the Order of St. John of Jerusalem in the great armour shops of Milan sometime in the late 16th century. Stylistically, it makes my efforts look pretty amaturish! On the other hand, I think I have the shape of the steel figured out. In the bottom picture, I have just finished cleaning the piece of all its rust and crud from years of benign neglect. Mr. Stroud, the curator of the Palace Museum in Malta is explaining the results of a recent metalurgical survey on his precious armours. The job took about three hours, and a labour of love. It was not particularly dirty after all, and I did not have to go into the chiseled decoration at all. Thank goodness for that! I was not looking forward to two weeks with dental picks!

The piece is remarkable in that the edges are not just rolled, but roped as well, and there are some embossed parts...that is parts that are raised up and away from the metal....the roped decorative strip an inch or so from the edge of the arm holes, and the embossed medallions at the back. There were several of these backplates there, all had the medallions and embossed lines which seemed to be standard. The roping and engraving on the medalions are all added on later, and of course are all different. The patterns on the three big wide stripes are made with hammer and punches in a process called (paradoxically enough) raising. The pattern is fairly common, the curators call it "pots and pans". The metal was probably backed up with lead during the raising process, and neillo was burned into the depressions. Special bricks were used to polish the surface after that. The broken rivets near the bottom are all that remains of the steel buckle mounts. I have no idea how they managed to raise the pattern near the bottom....I can only think that the roping was pushed up after the decoration was all done. I like it! No doubt in a few years, I will be doing work just as good. (sure.....I believe that!)

Leathering


For some reason it takes a long time to strap and "leather" an armour. I am getting quicker at it, but I still have to tweak and fit the plates so that they all work together.

I use two part solid copper leather rivets for this job. Nothing else will hold well enough, and yet be easy enough to chisel off when I have to replace the leather down the road, say, in 3 to 5 years. Often armour comes back to me rusty, with the leather stiff from dried sweat, and full of dents from the experiences it has gone through. Such a repair will usually take most of the day, because I have to remove all the leather, and bash out any dents. And there will be lots! I try not to make it look brand new though....those dents all tell a story. Worn, old, heavily used, but properly re-furbished armour is VERY beautiful.

There has to be tongues of leather under the shoulder tabs just to protect the skin. Often, I rivet leather lining to supplement the rolled edges. And the leather straps which hold it all together have to be installed. The bottom edge has to have a nice flare so it does not cut into the buttocks. The length has to be quite precise, and on repair jobs, changes in girth must be accomodated. I have been known to lengthen horizontal measurements of the bottom plates to accodate a few years of high living, and to occasionally increase the chest size as this sport does tend to change your somatype. Once in a while, an armour comes in which was bought by a new owner, and I am required to make it fit the new guy! The vast majority of these changes are accomodated by changing the leather.
Lots of things can be done to fancy up the armour at this point! Picadills can be cut from suede leather , and riveted onto overlapping plates so that they don't scratch the underlying plates. These picadills are often brightly coloured, and may reflect the livery of the household, or the coat of arms. Brass highlights may also be added, as well as steel hinges, lance rests and so forth. These are finishing parts of the armour maker's craft, and were done in town, close to the client.
Back in the old days, the armour would have been made as mostly finished plates close to the power machinery which made the steel. The more you finish them, the lighter the load you have to send by pack mule from Sheffield to London, or from Turin to Milan over those horrid medieval roads! However, the client didn't want to travel all the way to Sheffield to get fitted to the armour, so districts would grow up in Medieval and Renaissance cities which specialized in one thing or another...books, coats, woodwork, that sort of thing. The armourers had a street as well, maintained by the guilds. Since all the noisy, dirty and smelly work had been done outside the city, the street of armourers would concentrate on fitting, leathering, and picadilling the stock armours for wealthy clients. The street of the armourers in London is called Picadilly Circus for that reason.
Once the armour was properly fitted, it was disassembled, sent out for etching or engraving over at Tower Hill, then sent back to Picadilly circus to be picadilled and the final leather installed, ready for delivery. Every three to five years, the amour would go back to have the picadills re-newed, the armour properly buffed and cleaned, and re-leathered. It might also be niello'd and gilded. Niello is a silver-sulphur mix which is burned into depressions punched into the armour. It makes a lovely tough black surface which is much less likely to chip off than fired on enamel. Gilding is a process that mixes mercury with gold, and again, is fired so that the mercury is driven off, leaving the gold highlighted. The black neillo and gold look awfully good together! In the top picture, I have shown a closeup of an armour Jean made in my shop showing the prettiness of mixing brass with black steel. Notice the lack of scapula ridges...I think that armour looked better without the sculpuring. I also think I could have done a better job of planishing on the sculpted one! Ah well, its the harsh oblique light. Thats my story and I'm sticking to it!

Curve to fit the body


Piece of cake at this point! The armour now has to be curved around the horn of the anvil to help it to fit the body. The backplate normally fits under the breastplate, and the upper part of the backplate (the part we have been working on) will fit neatly over the bottom parts. I like the look of the three part armours, though of course, backplates were made as single and two piece plates as well.
Wipe the pieces down with lacquer thinner to take off markings from your sharpie pen, and to take off fingerprints. A quick coat of high gloss spray lacquer at this point will dry in 5 minutes, and will protect the finish against fingerprints. I often give it a good sanding with a succession of grits from 8o on up to 120 grit with a palm sander, but a lot of people prefer the look of the planished steel. So do I actually, so I often don't try very hard to get all the hammer marks out. People who complaing about hammer marks on armour would complain about brush strokes on a painting! A lot of people decide to like the hammer marks when they discover they have to pay me 20 bucks an hour to sand them all out.
As you can see in the picture, the hammer marks are not really all that intrusive. You have to watch people who skip the planishing stage and then brag about how "handmade" their armour looks. Thats just bad workmanship. Your armour should be smooth enough after planishing that you would take no more than one gauge number off when sanding all the marks out. Real medievel armour was heavily sanded! They often took off two or even three gauge sizes off the steel in the process of sanding it. I'm not sure why this is....but I have a suspicion that sanding is a job which can be done by a slave, or an apprentice, whereas planishing would need the expensive services of a trained craftsman. That is not the only answer of course...perhaps they had water powered wheels which did the job really fast...so it would take less time to sand it than to planish it smooth. Hard to say, both speculations can be supported in literature.

The shoulders


Most people are surprised to discover how much more material goes into the back of their shirt as opposed to their chest. That is one reason why the back plate is so much more interesting to make than a breastplate...there is more space to work with, and more scope to make it look pretty.
You have to prepare the piece by laying it onto the anvil, and pushing out the ridge. A body has very little ridge between the shoulder blades. Then, when you are happy with the way it looks between the shoulder blades, you flip it over so the inside is now laying over the curve of the horn of the anvil. Working with the rubber mallet, you curve the arm opening until it starts to look good. Some gentle work with the mallet and anvil will bring the space beween the arm holes more three dimentional. I sometimes make the triangle above the shoulder blades a little more three dimentional....it helps to cover that bump you can feel on your back just at the base of your neck.
Eight out of ten people who read this have just felt for that bump. That bump is half inch long piece of bone that sticks out of your spine at that point, and it would really really hurt to break it!

shaping the bottom edge


Rubber hammer and anvil horn . Fold the armour over the horn until it gets the right shape, then reverse curve to show off the spinae erectae muscles. Often I'll shape the intermediate piece of armour at the same time to ensure a good fit. When you finish, you want the suggestion of a curve. A common mistake is to leave a bump which will dig into the spine.
Observe the obsessive use of duct tape to keep from scarring the surface!


I do a lot of pushing the metal around by hand at this point, and discover where the sharp edges are!

Planishing


The dreaded "Planishing". This step alone takes more time than all the rest up until now! A planishing hammer is lighter than a bouging hammer, and just as shiney. Working from the inside, the armourer places the workpiece on a hard piece of shiny steel and hammer mark after overlapping hammer mark back and forth on the workpiece.

Most anvils are not polished enough to do this, so I use a piece of highly polished hardened steel which sits in a neat cout out in one of the wooden anvils. I have met people who have polished anvils for this job. It takes a couple of days to polish and anvil good enough, and then you can't use it for anything else BUT planishing!

The hammers are moved in a quick little wrist flick, and the elbow is held beside the body in order to provide precise control. Then, placing the workpiece over a ball (a cannon ball would be nice if I could find one), the armourer smooths the outside of the workpiece. For the outside, a flat faced hammer is often used. The faces must be very shiny, little mirrors. When every square centimeter is covered with overlapping hammer blows front and back, the worker will examine the surface carefully by oblique lighting, and by feel...often with eyes closed, looking for flat spots, high spots, and textural problems. I have been known to re-bouge and re-planish spots which show up at this point, so I tend to do a cursory once through with the planishing hammer just to take down the big bumps and fill the worst dents before really going to town with the "finish" planishing.

Friday, April 28, 2006

Bouging the steel


Bouging is one of those terms which means pretty much what you think it means. You place the steel sheet over a divot in the wood and bouge it with as big a hammer as you can swing with one hand. This part goes quick! It has to! The arm can only take so much! Here I am simply making several overlapping dents in the metal following the line of the client's scapula, steep towards the spine and feathering it out towards the arm's rolled edge.
A blacksmith of my acquaintance once watched me bouging a breastplate, and he made a comment that there were only three reasons why a blacksmith would go straight to hell. They are, according to him, "laming a horse", (with a bad shoe)," not charging enough for the job", and "pounding on cold steel". Well, I don't think my armour will cause a horse, or a client to go lame, and yeah, I probably undercharge for my work, and all my steel is hammered out cold. Guess I'll be hitting the "down" button when I punch the clock for the last time!!!

Back in the early days of this craft, there were silversmiths, goldsmiths, blacksmiths and whitesmiths. The blacksmith worked with hot metal....the oxides and fluxes he used makes the metal black as soot! Most iron work has a black coating on it even today! The whitesmith became the modern "panel basher", or auto body man. The armourer traditionally did his work cold, and only occasionally resting it in the fire to relieve its stress. And then, rather than trying to push it around while hot, the whitesmith often lets it cool slowly in a cushion of ashes so that it has no hardness in it at all. That slow cooling is called "annealing". A backplate like this can only be done cold. The stresses you produce at this stage combine to create the magic of a well fitted back plate. Hot work would spoil the project.

Dishing or raising.....two different processes to describe a superficially similar result. A backplate must be dished down into a block of wood to work. You cannot raise a backplate by pounding the metal over a raising stake. Dishing stresses the metal a lot less than raising. Armourers will argue this point all day, however today I am showing the dishing operation that works so well and is so easy to do. The whole raising technique is for another day.

The pictures show how I follow the line of the shoulder blades. (The top picture shows what we want to do....the second and third show the sequence) Not only does this make room for the shoulders, but also causes the top of the armour to roll inwards, towards the back of the neck. I discovered this technique when I had the honour of cleaning a back plate for the Palace Museum in Malta.....the size, shape and orientation of the hammer marks on the inside clearly showed to me that this was the way to do it. Imagine my surprise and delight that when I bouged the shoulder blades exactly like that 16th century Milanese craftsman the metal "snapped" into perfect curves!

The Wooden Anvil


For some reason, I have never found a historical picture of an armourer working on a wooden anvil. Yet every armourer I know bashes more metal out on his wooden "stump" than on the steel anvil. The advantages are many. Wood does not scratch or dent the workpiece, it stands up to the impact very well. The wood has a certain amount of "give" to it which prevents the metal from being pinched and made too thin for its intended use. Lighter metal is often "bashed" into a sand bag. Sometimes lead shot is used instead of sand, and the heavy leather sand bag is generally about a half meter across, and rather pancake shaped. The sand bag is often laid on the surface of (you guessed it) a sawn cylinder from a tree...a stump. I like to use poplar, admittedly hard to find in the half meter (18 inches) you need to make a good dishing stump, but not impossible. The best wooden anvil is the part of the tree that causes any firewood splitter to quit when asked to reduce it to flinders. That part is the root of several boughs...or the root stump itself. The grain of the wood is not straight...it is in all directions, and so consequently difficult to split. This characterisic is a good thing when you are using a "round" to support an anvil, or to actually expect the wood to BE an anvil.
Wooden anvils are cheap, and easy to replace when the time comes, say 2 or 3 years. The wood in the picture is just about finished....a plank has been hammered out of the side of it, its starting to get unstable. I chisel divots into the surface, then flatten the end grain down with the ball of the ball peen. This leaves a "dish" into which I can push the steel. It need not be deep...say...a half inch is more than enough. One danger of useing wood is that it tends to catch grit and metal filings. These can be driven into the wood where they become almost invisible, but are a constant source of annoying scratches which will need to be buffed out later on. So don't place the wooden anvil near the drill press or sander. A second danger is that wood may carry ants or termites....who may depart their noisy abode and take up residence in the walls of your shop. I once caved in the top of a wooden anvil to find it hollow, with a half dozen terrified mice looking up at me! The stump had been unused for a year, and was being put back into service at a shopping mall demo because it looked so darned good!
You can see in the pictures how shiney the hammers are. I am getting really good at putting a polish on a hammer face...I can usually take it from factory to glossy in about half an hour. Touching up the gleam on the faces is one of those apprentice jobs....like oiling the air tools and dressing the mushroom off the struck end of a chisel.

Thursday, April 27, 2006

Building a back Plate, finish rolling


An armourer's anvil is a bit specialized. It has to have sharp edges, rounded edges and be longer than the usual range of anvils. The metal is pretty thin by blacksmith standards, so it does not need to be nearly as heavy as a standard anvil. Some weight is needed though! A modified railroad track is pretty good. Because it is not made of hardened steel, it has to be dressed frequently. As usual, I lay on a nice thick layer of duct tape to protect the metal. I have to replace the duct tape from time to time or else the wrinkles in the duct tape will transfer to the surface of the steel! The top picture shows my homemade armourer's anvil, welded to a big old chunk of I beam, with a dishing stump (wooden anvil) acting as a counterweight. This set up is pretty much what you would find in most workshops of the Middle Ages.
You will notice from the second picture that the anvil is quite sharp on the left edge and nicely rounded on the right hand edge. It is bullnosed to a 3/8 inch radius. That bullnosed edge is the one I use here.
The edge of the steel backplate is placed over the rounded side of the anvil, and pushed down with a soft hammer. (lead is common, nowadays we use urethane faced hammers) Because I am an un-repentant steel man, I use my trusty ball peen for this job, and use care to avoid weird dents. This is the point where you should install a wire if you are going to do it. In this example, I have not bothered. When you are all done, top part of the workpiece is totally flat (as shown by the square). That is the part which goes to the inside of the armour, against the body. No sharp edges! The bottom picture shows the roll from the inside. Smooth as a baby's bottom...

A further step is often used in medieval armours, and that is to take a dull chisel, and tap in diagonal dents all along the edge of the roll to make it look like a twisted rope. That process is called "roping" and for some reason is considered to be very fancy. I consider roping to be remarkably easy (compared to this rolling part!) and a poor reason to double the price of an armour. But yes, it does "make" the job look finished all right! I'll leave baling and roping for you to figure out...grin!

Rolling the edge, intermediate stage


You can see the metal gets neatly curled over the mould. I am using a brick chisel here, but there are specialized tools which are often made by the blacksmith. Sometimes I use the wedge shaped end of a cross peen hammer if that is all I have at the time. The most important part of course is the ball peen hammer. It is hard to see in the illustration, but the hammer face has been sanded until it is slightly rounded, then buffed to a mirror finish. That is because any scratch or dent in the hammer will be transferred to the work piece. For a similar reason, the anvil is faced with duct tape to protect the work piece. (Polishing the anvil would take a long time, but know people who have done it!)

In my workshop, there is a big sign up saying "Use claw hammers to drive nails and punches....use ball peens to hit steel". The "peen" part of the hammer is what you use for this job...the "ball" part of the hammer is used to peen over rivets. This terminolgy makes more sense when you think of the whole hammer being called a "peen". I'm sure it comes from an Anglo-Saxon word which means "Lump-o-iron". Blacksmiths in their normal every day to day work use a hammer called a "cross peen" hammer that has a wedge on the back of it, the striking line of the wedge being 90 degrees to the handle. A "straight peen" hammer would have the wedge in line with the handle...rather like a stubby hatchet.

Claw hammers are for nails, usually they are much lighter, and you don't polish the faces...in fact, some claw hammers are intentionally scored to grip the nails. Often claw hammers have steel handles. I hate steel handles. I shape the handles to fit my hands with the belt sander.

So now you know all about hammers. Well, not ALL about hammers, but enough to know that if you talk to an armourer about the most common tool of his trade, you will know that the armourer is the one with the balls....

Wednesday, April 26, 2006

Making a back plate part 2, Rolling the Edges


The reason you roll the edge of a piece of armour is so that it doesn't cut into your body. Generally you roll the armour anyplace where it touches the skin. Some exceptions exist, the gorget bib or the shoulder tabs on this backplate for instance, but when you have such an edge, you should line it with leather for simple safety reasons.
Safety is a funny concept. It is closely allied to liability. How much liability does the armourer have? According to my lawyer, anybody who purchases an armour from me has a "reasonable expectation of performance". Same as if he bought a car from me, he expects the engine to start, and the brakes won't suddenly fail on me. People that purchase armour from me expect it to be comfortable, long lasting, and capable of shedding weapons strikes. There is also something called "armour bites", where the armour causes damage to the person underneath, often unrelated to the weapons strikes! My job (among others) is to minimize armour bites. Rolling will help. Designing out 90 degree corners, and making space for underlying leather or padding is also within my perview. On your template, you must leave a half inch "roll allowance".
The first step of course is to determine which edges need to be rolled, and push it down over the heel of the anvil until a half inch flange of metal is sticking out all around the edge you want to make safe. Then using your nice shiny ball peen hammer and a big old brick breaking chisel as a mould, you curl the metal around until it it goes from 90 degrees to 180 degrees. It is best to not hit it too hard, or you just flatten it all out. You want it to have a space inside the roll. When I do this job right, I can slip a wire into the space from the end. The guys in the old days used to put a wire into the roll. This wire is called a "bail" and as far as I can see, it serves no useful purpose in heavy armour. When you are done, the edge of the armour should look and feel like the top edge of a metal bucket.
This rolled edge is very sturdy....and will be hard to push around.

Making a back plate part 1...Templates


First draft of a book tentatively entitled...."To be an armour maker like me" Please comment freely, this stream of consciousness needs to be corralled.

Part 1....Making the armour! Templates.
The first step is to develop a template, and then the pattern. This can take a lot longer than you think, and you have to make the piece over and over again, modifying the template every time until you have perfected it. Some of my templates have been modified 8 or 9 times, and I still have not got them right. To make matters worse, each template, after it is made, also has to be sized to the individual. A template sized to an individual is called a "pattern", and each pattern is pretty much disposable. The pattern contains a lot of personal stuff, like the kind of decoration, style of fluting or grooving the client wants, whereas the template is the bedrock design upon which you base the pattern. The artwork is in the pattern. The engineering is in the template.
Changing the template is hard. Changing the pattern is easy. Since most armour is customized to a greater or lesser extent, it is best to change the pattern rather than the underlying template. You can go broke pretty quickly by trying to make armour you have never made before! One time I fell for the line a client spouted.... "yeah, I want you to make the tin man from the Wizard of Oz. How hard can it be...you make much more complicated armours!" True, it was a much easier looking item, and in fact it is. However, it required 3 templates, and when I finally made the item it didn't fit him. "I waited almost a year for a simple costsume that doesn't even fit me! No way I am paying for that!". And lets face it, how could I charge for all that templating work. I was foolish to not break the job into two parts....the development and the production. As it was, I wasted weeks of effort, all a dead loss.

It really helps if the client knows what they want. And that they realize that if I custom build a job it will cost a lot more. A recent helm was heavily customized, and the client suddenly refused to pay for it. Too expensive. "Dude, you agreed to the extra work! Too expensive. I'm going elsewhere. "Fine" I said, I'll keep it here. Two weeks later, another fellow contacted me, wanted a helm customized just like the one I had lying around, and so we made a deal. It was about 30 bucks less than what I was going to charge the first guy, so I took a hit just to move it out of the showroom. (you know where this is going eh?) Turns out they were brothers, and they played this silly game in order to get a cheaper helm! All that hassle for three sawbucks!

They don't know what they want... the dreaded "Well, what does an armour cost"?
I just recently turned down a potentially high profit job....a local engineering firm wanted me to make a hardshell for military EOD armours. (EOD...Explosive Ordinance Disposal. They already wear expensive kevlar suits....this would be an extra shell. I guess every little bit helps!) Their thought was "hey, why re-invent the wheel...there are people who actually MAKE armour...we can just get them to pound some out. Again, price was no object if I could make what they had in mind. Trouble was, they wanted, like, 40 of them. In a month. They didn't know what material would be best....aluminum, steel, or stainless.....they didn't have a template made. I told them it would take a couple of weeks to define the template and make a couple of testers, and another couple of weeks to get the specialized aircraft aluminum delivered. I have no regrets about missing out on such a good contract. They didn't know WHAT they wanted so how on earth could I possibly give a completion date and a price!

Friday, April 14, 2006

The Pitt Rivers Museum


Oxford. My what delightful memories. Not at all the stuffy academic town you might think, it is a pleasant place to visit. My memories include the river with the pretty thatched building beside it, the old sheep shop (of Alice in Wonderland fame!) and of course, the remains of castles (three of them) scattered about the city. I never knew about the weapons museum, the "Pit Rivers Museum". The museum was founded in 1884 when General Pitt Rivers gave a collection of more than 18,000 artefacts to the University of Oxford.
Its collections include 150 objects collected on Captain Cook's second voyage to the South Pacific. The battle shield above is from Papua New Guinea.
(It caught my eye because of the mask in the centre of the shield....it is a spitting image of the comic book character "Ghost Who Walks" from my childhood. Anybody remember the comic? It was one of my favorites since the lead character did not have super powers, but, like the Batman, did it all on his own. But I digress....)
That shield is remenicent of the Roman Scutum in shape, but is actually a fairly light framework of willow wood, with cowhide stretched over it. I doubt it would stop many missiles, but might be useful enough against rocks and sticks, sort of like a modern riot guard's shield. I have seen a mannequin wearing Papaua armour....it is wicker armour, with a high collar to prevent rocks flung from your own side (from behind you) from braining you! Must have been an interesting time!
So, that gives me yet another reason to visit the auld city of Oxford.

http://news.bbc.co.uk/1/hi/england/oxfordshire/4888944.stm

Wednesday, April 12, 2006

Drills

Drills are different to form; they are short sequences repeated a number a times, and always focus upon a very limited application.
They take a form posture and consider small circle applications that might extend from that movement.Focussing in this manner enables you to see hidden possibilities of further application suggested by the form posture.
A drill is just one possible application but can lead you to see more choices within the posture.Drills are usually two person sets but should be trained solo as well.
If you want to train speed and power, perform the set as slowly as you can. The responses become second nature.It would be a mistake to focus too heavily upon drills, for they only represent a slither of form.

posted by Dynamic Balancing Tai Chi

http://dynamicbalancingtaichi.blogspot.com/

Sunday, April 09, 2006

IT Professional!


Global registration at British Airways clearly tries to be as inclusive as possible. When you register, you go to a registration page, which has the most complete "drop down" menus I have ever seen! Under "personal details" you have your choice of 104 titles, including Commodor, Pastor, Wing Commander and yes, Mister. The list of countries is double that of the usual list of countries. I think someobody was paid by the hour for this job....

http://www.britishairways.com/travel/inet/public/en_gb

Month in the Middle

When the border patrol pulled me over last summer when I was visting New York, they were highly suspicious of the Canadian way of stating the day-month-year as written down in governmental shorthand....in the US it is always written month-day-year, except sometimes when it is written year-day-month. (Yeah, I shake my head too!) For instance, my birthday is the twenty first of August, 1956. So my drivers licence has it as 21-08-56. My US importers permit has it as 08-21-56. More to the point, my driver's licence tags expired on my birthday, 21 Aug 05. Its written right there on the little sticker...21/08/05. Right....this was sometime in July, and according to them, the tag had expired in May. They eventually decided there was a problem when they suddenly realized that THAT meant the YEAR it expired would be 2021. Or maybe 2008. Hmmmm...... An hour later, they told me to move along. I noticed that the BP turned into the nearest pharmacy...no doubt to pick up a bottle of aspirin for the headache STAG always seems to give people!!!

This was my only real experience with the Border Patrol on the US side. Very nice people, but woefully untrained in cultural differences which apply to the people they have to deal with. I can only imagine the difficulty they face in dealing with Quebecers. Or Mexicans. Or Chicanos. Or Chinese.

Anyway, here's a little tidbit...

3 minutes after two in the morning of the 4th of May will be

2/03/04/05/06

Only in the British Empire...of course.

STAG....

Wednesday, April 05, 2006

More on Bob!


Yet more stories on the fight to free Bob the Moose Head! (Gosh, I remember when Moosehead was a beer, not a misdemeanor...) (as usual, click on the image, etc.)


http://www.torontosun.com/News/BobTheMoose/2006/04/05/1520809-sun.html

Tuesday, April 04, 2006

Free Bob!!!!!


Former moose head owner Ken Procyk, left, and Mark Bonokoski take their campaign to Queen’s Park yesterday. ( photo....Craig Robertson, Sun)

Bob is a moose head.

Specifically a family heriloom which he sold, like so many people do, on eBay.

Ken Procyk ( like me, a Ukrainan-Canadian!) had been given the moose head by his father, who in turn had been given it by a hunter. But Ken didn't have a licence to "export pelts". Bob was impounded at the border, and Ken was served with a hefty fine. 250 bucks from the Canadians, and 560 bucks in "storage fees" from the Americans.

In fact, armed officers arrived at his home, and served him papers!

I think you should check out Mark Bonokowski's column in the Sun. It will certainly challenge any residual ideas you might be having that "bigger government is better government".

http://www.torontosun.com/News/BobTheMoose/2006/04/04/1519108-sun.html

Go Ken. Go Mark. Go Bob!!!!

Monday, April 03, 2006

Greetings..

Shamelessly ripped off from the "Daily Nooze" My fave is the name of the cat...grin!


Rejected ideas from the staff of Hallmark Cards, as reported by The Associated Press:

Christmas
Front: Spread some holiday cheer.
Inside: Or drink alone. Who am I to judge?

Front: Christmas just wouldn't be the same without peanut brittle.
Inside: Or Jesus.

Birthday
Front: My ex-girlfriend had a cat named Love because she said that's what it gave her.
Inside: So I called it Bloody Forearms. Hope no one gets YOU a cat for your birthday.

Front: I wanted to give you a body piercing for your birthday.
Inside: But I didn't think I could get you drunk enough to where you wouldn't feel the stapler!

Wedding & Engagement
Front: Marriage is a bond that is unbreakable except by two-thirds of the population.
Inside: But it's you top-third couples that give the rest of us hope.

Miscellaneous
Front: When I think of you, Mom, I swell with pride.
Inside: At least I hope it's pride. Otherwise, I'm pregnant again.

Front: (Picture of Happy Face)
Inside: Hi! Welcome back from your coma!

Sunday, April 02, 2006

Canadian History


Just when I think I have heard it all, I find out another "factoid" which sets me on my heels! This one concerns the fellow who wrote my national Anthem, imaginatively named "Oh Canada". Oh sure, I knew he was a Francophone, and that the first time it was ever played was at a Jean Baptiste Day party in Quebec City. American Blog readers should know that the Separatist Party in Canada, based mostly in Quebec City, always holds a bit separatist rally on St. Jean Baptist Day. Its their day to chant secessionist rhetoric and so the fact that it was first played There and Then is really kind of ironic. What I didn't know is that the author, Calixa Lavallee, though born in Montreal, moved to the USA where he joined the blue coats in the War of Northern Aggression. (as my friend D'Arcy calls it) where he rose to the rank of Lieutenant. This was through the ranks, so you just KNOW the road to promotion was paved with the bodies of those superior in rank to him. If he was a bandman, then he was also a medic and ambulance man...and would have seen the results of secessionist rhetoric up close and personal like. So it must have been a labour of love to create a "bring together" song for the "The Con­grès Na­tion­al des Ca­na­diens-Fran­çais". Must have...it became a national anthem.
Lavalee died in Boston in 1891, and his body was re-interned 30 years later in Montreal.

Spring!


(click on image to enlarge)