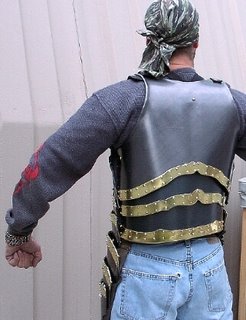


For some reason it takes a long time to strap and "leather" an armour. I am getting quicker at it, but I still have to tweak and fit the plates so that they all work together.
I use two part solid copper leather rivets for this job. Nothing else will hold well enough, and yet be easy enough to chisel off when I have to replace the leather down the road, say, in 3 to 5 years. Often armour comes back to me rusty, with the leather stiff from dried sweat, and full of dents from the experiences it has gone through. Such a repair will usually take most of the day, because I have to remove all the leather, and bash out any dents. And there will be lots! I try not to make it look brand new though....those dents all tell a story. Worn, old, heavily used, but properly re-furbished armour is VERY beautiful.
There has to be tongues of leather under the shoulder tabs just to protect the skin. Often, I rivet leather lining to supplement the rolled edges. And the leather straps which hold it all together have to be installed. The bottom edge has to have a nice flare so it does not cut into the buttocks. The length has to be quite precise, and on repair jobs, changes in girth must be accomodated. I have been known to lengthen horizontal measurements of the bottom plates to accodate a few years of high living, and to occasionally increase the chest size as this sport does tend to change your somatype. Once in a while, an armour comes in which was bought by a new owner, and I am required to make it fit the new guy! The vast majority of these changes are accomodated by changing the leather.
Lots of things can be done to fancy up the armour at this point! Picadills can be cut from suede leather , and riveted onto overlapping plates so that they don't scratch the underlying plates. These picadills are often brightly coloured, and may reflect the livery of the household, or the coat of arms. Brass highlights may also be added, as well as steel hinges, lance rests and so forth. These are finishing parts of the armour maker's craft, and were done in town, close to the client.
Back in the old days, the armour would have been made as mostly finished plates close to the power machinery which made the steel. The more you finish them, the lighter the load you have to send by pack mule from Sheffield to London, or from Turin to Milan over those horrid medieval roads! However, the client didn't want to travel all the way to Sheffield to get fitted to the armour, so districts would grow up in Medieval and Renaissance cities which specialized in one thing or another...books, coats, woodwork, that sort of thing. The armourers had a street as well, maintained by the guilds. Since all the noisy, dirty and smelly work had been done outside the city, the street of armourers would concentrate on fitting, leathering, and picadilling the stock armours for wealthy clients. The street of the armourers in London is called Picadilly Circus for that reason.
Once the armour was properly fitted, it was disassembled, sent out for etching or engraving over at Tower Hill, then sent back to Picadilly circus to be picadilled and the final leather installed, ready for delivery. Every three to five years, the amour would go back to have the picadills re-newed, the armour properly buffed and cleaned, and re-leathered. It might also be niello'd and gilded. Niello is a silver-sulphur mix which is burned into depressions punched into the armour. It makes a lovely tough black surface which is much less likely to chip off than fired on enamel. Gilding is a process that mixes mercury with gold, and again, is fired so that the mercury is driven off, leaving the gold highlighted. The black neillo and gold look awfully good together! In the top picture, I have shown a closeup of an armour Jean made in my shop showing the prettiness of mixing brass with black steel. Notice the lack of scapula ridges...I think that armour looked better without the sculpuring. I also think I could have done a better job of planishing on the sculpted one! Ah well, its the harsh oblique light. Thats my story and I'm sticking to it!
1 comment:
I am learning so much. It's just fascinating!
Post a Comment